Most of the posts and reviews on the new Keurig 2.0 coffee machines seem to fall into one of four groups:
- An ad for the machine.
- A review recapping the same information as the ad coupled some basic hands-on info and a rant or two.
- A rant about the new DRM approach being employed by Keurig.
- A rant about why you should be using (insert another brand coffee maker here) or a french press.
This post is not any of these things. It is intended to provide some additional information to those considering a Keurig 2.0 brewer and some tips & tricks to those who already have one. (Personally, I’m not a fan of DRM in any form, but I decided to purchase one of these machines for my office at work anyway.)
Keurig 2.0 Models – Clarification
First, a quick word on model numbers for the new machines. Many of the posts and reviews describe three models: the K300, K400, and K500. These model numbers appear based on the early descriptions and ads from Keurig, and were also used by a number of stores when preparing their websites for preorders. However, about a week prior to the actual release of the machines, Keurig updated their site and stores scrambled to make adjustments. The actual model numbers of the released machines are K350, K450, and K550. As far as I know, there is no difference in the features of the machine; they just went with a different model number for some reason. In other words, the K300 was released as the K350, and so on.
An Overlooked Feature
Most of the reviews I’ve read spend a great deal of time warning the reader about all the non-Keurig-branded K-cups they will no longer be able to use in their machine. And if purchasing “off-brand” K-cups is important to you, that is very important information. The other main topic covered is the availability of new K-carafe packs to brew a carafe of coffee. However, an often overlooked feature of the Keurig 2.0 machines is the fact that, in addition to K-cups and K-carafes, the machine also supports Vue cups. Even Keurig’s site and the owner’s manual that comes with the brewer fails to really point this out, though the information is out there if you look hard enough.
One question I had prior to purchasing the brewer was this: how are the needles arranged? If you’re not aware, K-cups use an input needle on top and an output needle on bottom, while Vue cups use two needles on top. Turns out the K2.0 machines have three needles, two on top and one on bottom. When you put the larger-diameter Vue cup in the machine, the lower needle swings out of position. When a K-cup is inserted, the second top needle lies outside the edge of the cup. It’s actually very well thought out and seems well-built.
The DRM Ink on Your K-Cups and Vue Cups
So there has been a lot of talk about the pros and cons of the new DRM strategy being employed by Keurig, but not a lot of information detailing exactly what customers need to look for to ensure their cups will work with a K2.0 brewer. Right now, there is a mix of older K2.0-incompatible K-cups and Vue cups and newer K2.0-compatible cups. This mix exists in physical stores, online stores, and even Keurig’s own website. Hopefully, this will only improve over time, but for now here are a few things to look for, both on the cup itself and on the box.
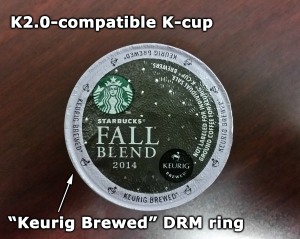
K2.0-compatible K-cups have a pale ring with the words “Keurig Brewed” around the edge. Do not mistake the classic dark brown circular Keurig Brewed logo, which also appears on the cups, as an indicator that the cup will work in a K2.0 machine. This logo appears on older cups as well. It is the pale ring you are looking for. If your K-cup is missing this ring, the K2.0 brewer will reject it. But there may be a workaround, keep reading.
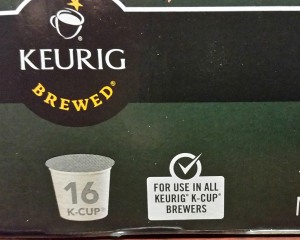
So far, it does not appear that boxes of K-cups are clearly marked as supporting K2.0 machines. However, older boxes are often marked as being incompatible with Vue machines, which means the box was likely produced prior to the inception of the K2.0 DRM and will not work in the new machines. When you’re in a store, I recommend looking for boxes that read “For use in all Keurig K-Cup brewers”. I haven’t confirmed this is a surefire way to get the right K-cups, but it’s worked for me so far. Unfortunately, this isn’t much help when ordering online.
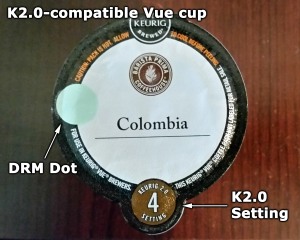
The original Vue cups have a black edge, the circular Keurig Brewed logo at the top, and a brown coffee symbol at the bottom (where the output needle is inserted. These older cups are similarly incompatible with the new K2.0 brewers. Newer K2.0-compatible Vue cups include two key features: a pale green dot on the left side which is used for DRM and a K2.0-friendly numerical setting at the bottom. More on the settings in a minute.
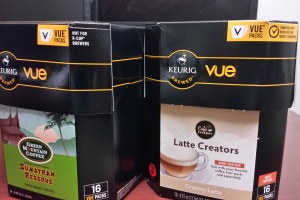
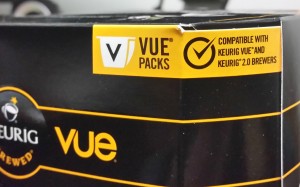
Fortunately, the Vue boxes are a little more customer-friendly. Older Vue packs simply read “Not for K-cup brewers” and are K2.0-incompatible. The newer Vue cups are clearly marked as “Compatible with Keurig Vue and Keurig 2.0 brewers”.
Trick: Use Old Vue Cups in your K2.0 Brewer
So what happens if you have older Vue cups or accidentally buy some? Well, there is a simple workaround that will allow you to brew an older Vue cup in your new machine. (This could theoretically work with old K-cups as well, but it’s much easier with Vue cups.) Basically, you’re going to use a label from a used newer Vue cup to fool the machine.
First, after you’ve brewed some coffee using a newer K2.0-compatible Vue cup, save the foil top. Vue cups are designed to be peeled apart and recycled, so this is easily accomplished by grabbing the tab at the top of the cup and peeling the foil off (after it’s cooled). This is one reason why this trick is easier with Vue cups; K-cups are really meant to be taken apart. The latte frother Vue cups work well for this because after you use them, there is nothing left in the cup. Probably a good idea to rinse and dry the label too.
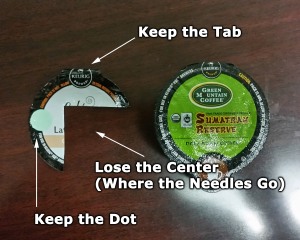
Next, I recommend cutting off part of the label. The objective is to keep both the DRM dot and the tab at the top while removing the foil from the areas where the needles will be inserted. This may not be necessary, but it reduces the chance of problems and lets you reuse the same label more than once.
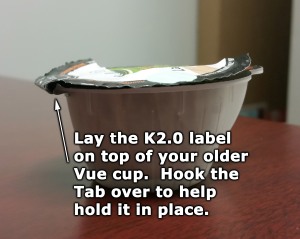
Next, lay the modified label on top of your old-style Vue cup and hook the tab over the edge to help align the label and hold it in place. This is another reason why this is easier with a Vue cup; the K-cup does not have the convenient tab. You might be able to accomplish something similar with a piece of tape, but that could lead to unforeseen complications.
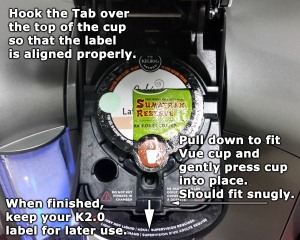
Finally, insert the cup into the brewer. The K2.0 machines have a small black plastic tab at the bottom edge of the chamber. Pulling down on this tab makes room for a Vue cup; it also moves the bottom needle out of position. Pull down on the tab and insert the cup. Press gently and the entire rim of the chamber will expand slightly, allowing the Vue cup to fit easily but snugly into position. If the tab on the label is hooked over the edge, the rim of the chamber will also help hold the label in position. This is yet another reason why this is more difficult with a K-cup, as they do not fit into the chamber in the same way. Now simply pull down on the lever to close the machine, which should recognize the cup as K2.0 compatible and give you a choice of brew settings.
K2.0 Vue Cup Settings

As I mentioned, the manual that accompanies the brewer hardly mentions Vue cups, and it provides very little information on the associated color-coded numerical settings. Supposedly, these settings should correspond to specific temperatures and other particulars necessary to produce an ideal brew, but we don’t know much. K-Carafe packs, which are essentially just tall Vue cups, use setting 1 (purple). Normal coffee Vue cups use setting 4 (brown). Two-part cappuccino/frother Vue cups use setting 5 (cyan). As for 2 (yellow), 3 (green), and 6 (orange), I’m not sure what they are used for. Keurig makes reference to “future innovations” relating to these settings on their website. Based on a chart in the manual, we know that settings 2 and 3 both use larger cup sizes, so I’m guessing these are for travel mug-sized Vue cups, but I haven’t seen a K2.0-compatible variety of these to confirm.
Basically, you just push whatever button corresponds to the cup you’re using, or use a setting from a similar style cup if you’re using the trick above. Each setting has a corresponding range of brew sizes, and the standard 4 setting for coffee tops out at 10 oz. so if you need a larger amount you could select 2 or 3 instead for larger options. Just keep in mind the strength of the coffee may be affected. I encountered a similar issue when using the 5 setting for a frother/coffee combination. When selecting 5 you will be directed to insert the frother cup first, which produces 4 oz. as with Vue brewers. You are then told to insert the coffee cup, and the setting defaults to a Strong brew, also like the Vue brewers. However, while my home Vue brewer allows me to increase the brew size to 6 oz. at this point, the K2.0 brewer is limited to only 4 oz. I’m not sure of the reason for this, but there is a simple workaround. Simply touch one of the arrows by the 5 and select a new setting. I’d suggest 4 with your preferred brew size, and remember to reselect Strong.
Wrap-Up
So that’s all for now. If I come across any more useful information or tricks I’ll post them here.
Natal, really great info that is factual and not a useless rant. As a Vue owner, I really appropriated your having confirmed in the real world that older Vue cups will work and your work-around if we need to use older Vue cups with the 2.0
As for the model numbers, it turns-out that the standard retail models are, indeed, 300, 400, and 500 and that has not changed. However, the late addition of the model numbers 350, 450, and 550 are for special retailers such as Costco. There is no difference with the machines themselves between a “00” and a “50.” The difference is in what is included in the box. The “50’s” will all include a Carafe and higher numbers of starer cups for the brewers. While it is true that the “00’s” also include a Carafe, Keurig has stated in its quarterly that this is only for launch and that next production “00’s” will NOT include the Carafe. In the near future, unless one purchases a “50,” they will have to buy the Carafe as an accessory item.
Keep up the good work.
LikeLike
the 50 is a standard item sold in places such as BBB, the 560 is what is sold at costco
LikeLike
My Vue machine just died, and after looking at the new Keurig 2.0 machine, and reading numerous rants, I elected to buy a machine just like the one I already have on clearance. Perhaps if I had run across this post before, I would have chosen to go with the newer machine. My main reason for getting the old model is because I use the Solofill V2 cup to brew with both K-cups and regular ground coffee in my Vue machine. I think you could use the same foil top trick to use the Solofill cup in the new machine. While I didn’t see this before I made up my mind, hopefully it will help a lot of other people.
LikeLike
Since you like to experiment and have experience can you figure out a way to make the fill your own baskets work in these machines? I am going to be getting one for free to try and share my opinions on so I didn’t really get a choice in what model type to get. Hey free is free so who am I to complain? That was the one thing I was looking forward to only to find out I won’t be able to use one! And I’m hoping there will be a decent amount of compatible products on the market since it probably won’t come with many. I know the sales model only comes with a few, I’m hoping that since they want me to share they will throw in an extra pack or two to really get me chatty! ;0p
LikeLike
I know that many people have reported problems with the fill-your-own cups plugging up the Vue machines, and Keurig specifically stating that even their brand of these accessories will not work. They were replacing Vue machines under warranty, but I expect this was due to those machines not selling particularly well and a desire to avoid losing customers.
As far as the new K2.0 machines are concerned, I’m not sure if those cups will fit. Given Keurig’s desire to lock out third parties, it seems unlikely they will choose to support fill-your-own varieties, even though this might be a good way to improve their reputation.
If I learn anything else, I’ll be sure to post it.
LikeLike
I have a fill your own, off brand, carafe and single fill items(?) I bought from Amazon. Both work. As to the coffee quality I’ve only made two attempts at carafe size brews and the first I had to throw out because I forgot to take the desiccating gel pack out of the carafe. I used the setting for 2 to 3 cups and I got about two and a half cups out of it and I withhold my opinion on the quality until I played with the settings a couple more times. I can’t find any information on the settings and how they apply to the fill your own cup version.
LikeLike
How are you getting a machine for free?
LikeLike
Just take a piece off the 2.0 k cup from the mini coffe cup design to the next and glue on top of ur refill on the left side and it will work do it all the time
LikeLike
As previously noted Kuerig is making every effort to lock out other “3rd Party cometition– They stumbled on a golden gouuse and now want to keep anyone else from competing wtht their ability to collect on royalties for anything made for their goose. This was what the Vue was all about wasn’t it? but too many people had too many $$$ vested inthe original K-cup systems so dispite the few gimmicks they added to create Vue ( including size traps to stop the Kcup competoin) it failed adn the k-2 probably will not be that big a seller- for the same reasons– all this technology was a vailable befor the original Keurigs came out – but Like SOny – choose to withhold features for future sales to upgrade. I believe theri were other systems like Sansea or Bosch’s pod system that already had encoded pods to preset temp and volume automatically. Ialso believe they will try to push Cuissanart, bunn, and Mr. Coffe out of making compatible brewers theri by creating a staranglehold on all things Keurig as Apple has tried to do time and again.
LikeLiked by 1 person
Not ONE single word about coffee grinds spilling all over the inside…hmm, must just be me. This is the 2nd K2.0 we have bought in the last 30 days. Both have the same issue. After every 3-5 cups, the grinds are spilling out all over the place. Now before someone tells me to clean it…these are brand new units with only 30 cups under their belts…and we rinse after any hot chocolate…HELP
LikeLike
I’m having the same problem. Did you ever figure it out?
LikeLike
I purchased a refillable cup from Keurig and theirs locks close a lot better than the first ones I had for my other machine. It let the grinds get out and made a mess the black one form Keurig is great try it.
LikeLike
I bet most people, like 95%+, do not know about the fact it can support Vue packs.
LikeLike
Here is another great trick for a better coffee: Do not use stupid machines. Brew it with a hand-filter, save a lot of money and impress your friends that you are able to brew coffee the traditional way.
LikeLike
Dirk is clearly the dope who stumbled across a good post and he has nothing to offer so he rambles about something pointless. Go make your coffee your way dude and save your stupid comments for places where people care about them. This is about the 2.0, not impressing your “friends” with some antiquated way of brewing.
LikeLiked by 1 person
Gee Dirk…
LikeLike
Or you can get a free DRM Freedom cup from: http://www.gourmet-coffee.com/Keurig-DRM-Freedom-Clip.html .
This easily defeats the Kuerig attempt to only use their “licensed” K-Cups. Simple clip.
LikeLike
We use the refillable cups all the time to save money. We do have to clean the needles every 3-5 cups/carafes. Its a high maintenance coffee maker.
LikeLike
I recently purchased a refillable k cup to go in my 2.0 K550 and it works great, somehow it bypasses the D R M . It’s called eco-fill 2.0 deluxe, or there is another one that you have to have a filter in put out by the same company . You can put one in the other one but you don’t have to . You can get it from eco fills website amazon and I’ve seen it on bed, bath and beyond’s website. Or just Google eco-fill 2.0 deluxe. I ordered mine straight from eco-fills website. Works great and is around $20. Hope this helps
LikeLike
This is the only website I have found that actually has useful work-arounds for the K2.0 system. Keurig manual and website were useless! I have discovered an additional work around. The use of a hot pink sticker allows full access to the main menu of six options (carafe plus the 5 single cup options) as pictured above. I just got the K2.0 (550) from Costco and used the “freedom clip” (with orange sticker) that was provided with my San Francisco Bay k-cups in order to brew these k-cups. However, orange limited me only to smaller brew sizes, and would not give me larger travel mug sizes. I played with different colored stickers inside the “freedom clip” and found hot pink gave me full access to all brew types. FYI, and happy brewing!
LikeLike
Best bit of “Keurinstein” (or “Frankenig”) hack advice so far. Hot Pink…who woulda thought?
LikeLike
I just purchased a Keurig online at Costco.com, the K560 model @ a good price, $125. However even, instead of receiving a K560 I was shipped a K550. I received all of the extra accessories listed online at Costco.com as well as the correct number of K 2.0 pods, along with the Karafe and water filter with a 80oz tank. As far as I can tell the K550 is identical to the K560 (which isn’t yet listed on the Keurig website.)
Comments? Everything worked perfectly and I’m keeping the unit.
LikeLike
Yep. Same thing – just a different model number for certain retailers.
LikeLike
The simple fix for the DRM fuss is to color a piece of paper with a Sharpie Neon Yellow marker (office supply about $2), and tape it to cover the square window in the upper part of the lift up lid. Also tape the exposed underside of the paper to prevent steam damage. Then all the cup and carafe menus are vailable! It’s been four months and still running with no problems at 5 plus cups of ‘Brand-X’ cup products a day!
I sure would have liked to have been in the boardroom when this hack was brought to light (!-)
LikeLike
Help!! I returned my model 550 because it wouldn’t brew past 8 ounces even though it was set on 10 ounces….so no morning, large mug of coffee. I just used the new machine, same model, set it to 10 ounces and it filled the cup 8 ounces…..what’s going on ??? Any tricks for this to fill my mug???
LikeLike
I’m curious, have you used a measuring cup to make sure it is only brewing 8oz when you select 10oz?
LikeLike
just unplug the green wire inside the unit that will turn off the DRM so you can use what ever you want with out putting dots or pieces of paper in it I have had my 2.0 for a year and have had no problems with it since
LikeLike
Where do I locate the green wire? Will that let me brew more coffee or does that let me raise the temperature I like my coffee with cream and that makes it to cold. I also have problems making the little round nob on the bottom of the Karafe fit the hole.Thanks for any information you can give me.
LikeLike
FYI: the Keurig 2.0 heats water to 163°f, not the 212° needed for black (Lipton), Earl Grey or herbal teas.
LikeLike
Correct. While you can use the Keurig to heat water for tea, it is not recommended for ideal brewing temperatures. Setting the temperature to maximum can get it hot enough for green and white tea, though you have to be careful not to go too hot. Plenty of guides around for proper tea brewing temperature, and I can confirm it does make a difference. Personally, I recommend something like these water boilers from Zojirushi; they have multiple temperature settings for different types of tea.
LikeLiked by 1 person
Can you make the water hotter?
LikeLike
Great explanation! Any update on the “future innovations” for the 2, 3 & 6 settings? Thx.
LikeLike